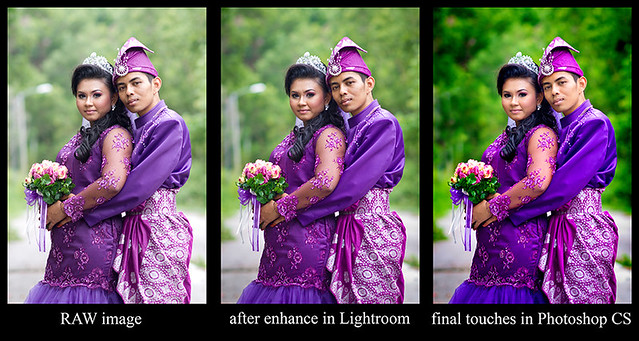
Interesting isn't it? for this portrait it only took me less than 10 minutes to finish it. Let me share my processing skill with you.
Image 1
- This is my how my raw image looks like, i did a mistake by shooting it a bit overexposed. I supposed to shoot it under so i wont lost the detail.
- For the shot I use my Sony Alpha full frame DSLR a850 with and a Minolta 85mm f2.8G(D).
- To get a great smile and moment I choose to shoot on Aperture priority and it really does work for me all this while.
- Here is my exiff data :-
- aperture at f2.0
- Center weighted metering
- Auto White balance
- D range - off
- I make sure that both the bride and the groom pose align so i can get sharp image on both of them
- After i compose on my viewfinder I shoot it and kill it :P
- Simple isn't it?
Image 2
- After I import the image into my Lightroom Library I straight away choose my image to enhance. the setting is very simple, check it out
recovery : 6
fill light : 20
clarity : 30
vibrance : 50
Sharpening at 100(masking at 80)
vignetting : -20
- Try it and find out
- Image 3
- After I enhance my image on Photoshop Lightroom i export the image to Photoshop CS. I only use Photoshop CS3, the reason it simple, what I do on my picture I only need Photoshop CS3.
- Please follow this step and put some effort on doing some downloading in youtube. Checkout the steps below.
- What I do I duplicate the original image and change the image mode from RGB to Lab Color and adjust the colour contrast to 50 instead of 100. After that change back the image mode from Lab Colour to RGB. (Find Lab Color enhancement on Youtube)
- Then I choose "selective color" on Adjustment Layer icon. What I do I reduce the black on Red Channel and Yellow Channel to get the perfect skintone. Then I press CONTROL + BACKSPACE and finally I brush on the skin on the image.
- I repeat the same step but this time I increase or decrease the black on every channel depends on my personal view/taste. After that I erase the skin so the current effect wont effect on the skin tone.
- Next, I choose Saturation on Adjustment Layer and I increase all the colour based on my eyes. Then I did the same thing where I erase the skin area.
- Then I Dodge and Burn on the area that I wanted based on personal Range and Exposure percentage. Normally Just use 20% on the exposure.
- There are times where I play with curves to get the best contrast for my image.
- finally I remove spots and soften the skin of the bride and groom> for soften skin you can find the steps on Youtube.
(sample 2)
Really hope that you find this entry useful. Remember, try and error is the best lesson for us, so does respect each other. Good Luck


eman mcm nk buat softskin
ReplyDeletehang baca tak?
DeleteHebat betul images En.Emann! I'm a fan :)
ReplyDeleteI'm inspired.
Thanks for sharing the info.