Saturday, May 12, 2012

Image Enhancement

image enhancement

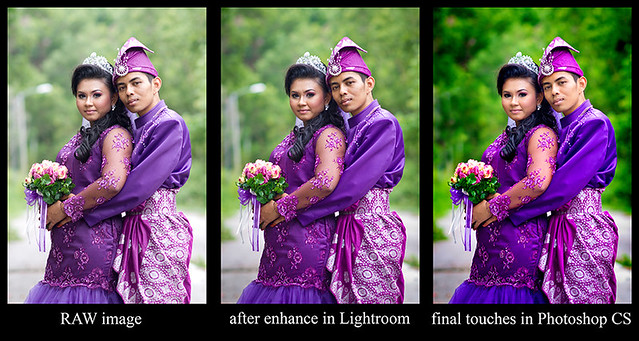
Interesting isn't it? for this portrait it only took me less than 10 minutes to finish it. Let me share my  processing skill with you.

Image 1
  • This is my how my raw image looks like, i did a mistake by shooting it a bit overexposed. I supposed to shoot it under so i wont lost the detail.
  • For the shot I use my Sony Alpha full frame DSLR a850 with and a Minolta 85mm f2.8G(D).
  • To get a great smile and moment I choose to shoot on Aperture priority and it really does work for me all this while.
  • Here is my exiff data :-
             - iso 100
             - aperture at f2.0
             - Center weighted metering
             - Auto White balance
             - D range - off

  • I make sure that both the bride and the groom pose align so i can get sharp image on both of them
  • After i compose on my viewfinder  I shoot it and kill it :P
  • Simple isn't it?


          Image 2
  • After I import the image into my Lightroom Library I straight away choose my image to enhance. the setting is very simple, check it out
             exposure : -0.3
             recovery  : 6
             fill light     : 20
             clarity       : 30
             vibrance  : 50
             Sharpening at 100(masking at 80)
             vignetting : -20
  • Try it and find out


  1. Image 3


  • After I enhance my image on Photoshop Lightroom i export the image to Photoshop CS. I only use Photoshop CS3, the reason it simple, what I do on my picture I only need Photoshop CS3.
  • Please follow this step and put some effort on doing some downloading in youtube. Checkout the steps below.
  • What I do I duplicate the original image and change the image mode from RGB to Lab Color and adjust the colour contrast to 50 instead of 100. After that change back the image mode from Lab Colour to RGB. (Find Lab Color enhancement on Youtube)
  • Then I choose "selective color" on Adjustment Layer icon. What I do I reduce the black on Red Channel and Yellow Channel to get the perfect skintone. Then I press CONTROL + BACKSPACE and finally I brush on the skin on the image.
  • I repeat the same step but this time I increase or decrease the black on every channel depends on my personal view/taste. After that I erase the skin so the current effect wont effect on the skin tone.
  • Next, I choose Saturation on Adjustment Layer and I increase all the colour based on my eyes. Then I did the same thing where I erase the skin area.
  • Then I Dodge and Burn on the area that I wanted based on personal Range and Exposure percentage. Normally Just use 20% on the exposure.
  • There are times where I play with curves to get the best contrast for my image.
  • finally I remove spots and soften the skin of the bride and groom> for soften skin you can find the steps on Youtube. 

progress
(sample 2)
Really hope that you find this entry useful. Remember, try and error is the best lesson for us, so does respect each other. Good Luck 

Thursday, May 10, 2012

Me & my Minolta 85mm f1.4G D (review)

Meow
(iso 200, f4 on aperture priority)

I just bought myself a Minolta 85mm f1.4G D. Do I love it? hell yeah. So, for the past two weeks I've been testing the lens. Surprisingly the lens really impressed me.

My Handycam
(iso 200, f1.4 on bounce flash, unedited)

The picture above is a picture of my handycam taken on full aperture and unedited. Just look at the detail, bokeh, colour, contrast and the depth, really awesome right?

_DSC6488Testing my New Lens
(my first shot with the lens)

The Minolta AF 85mm f/1.4G (D) is one of the old professional grade lenses by Minolta. Obviously it is a discontinued item now because Sony took over Minolta's photo department back in early 2006. In the meanwhile the lens has been replaced by the Zeiss ZA 85mm f/1.4 - not exactly a cheap lens so used Minolta AF 85mm f/1.4 G are in high demand on the used market where they seem to sell around 700 €/US$ vicinity at the moment. On APS-C DSLRs such as the Sony Alpha 100 (used for testing) its field of view is equivalent 128mm so it doesn't really leave its primary scope (portrait photography) here.
(source : www.photozone.de)


As from my point of view, the lens really performs well for its price and it also depends on the user himself. Some user owns a kick ass gear but come out with a crappy result and some just us a basic gear but the result really good. In my opinion, the only lack about this lens is slow focusing, chromatic aberation at f1.4 and it quite expensive for a used lens but worth every penny. Lemme share with you some of the results. My first session with the lens I've made a mistake by set the exposure to Zero, some how the picture turn up to be brighter in my PC. So, what I did I set it to minus 1 on the exposure, check this out:

Hafiz Jeffer
(iso 100, f1.4 on aperture priority)

Hafiz Jeffer
(iso 100, f2 on aperture priority)

Hafiz Jeffer
(iso 100, f1.4 on aperture priority, shoot at low angle)

Hafiz Jeffer
(iso 100, f1.4 on aperture priority, shoot at low angle)

For your information, the pictures above I didn't increase the saturation, what I did was I just adjust the colour contrast in lab color mode then adjust the black on every channel and finally burn on few places. What do you think? Oh ya, smart sharpen(motion blur) at 100 and margin at 1

Bit Bit Vivit
(iso 100, f1.4 on aperture priority, shoot at low angle)

Good contrast produced by the lens, check out the sample above.

Mischa Luvriella
(iso 100, f1.4 on aperture priority, shoot at low angle)

I really love the dimension produced from the lens, the subject somehow pop up from the background. Frame your picture well then just snap.

Mischa Luvriella
(iso 100, f1.4 on aperture priority, shoot at low angle)

Look what happen when I burst the colour, wow isn't it? hehehehehe

Kristi
(iso 100, f1.4 on aperture priority, eye level. Normal tone)

Kristi
(iso 100, f1.4 on aperture priority, eye level. warm tone)

Abby Kumicky
(iso 100, f1.4 on aperture priority, eye level. Look at the dimension and colour contrast)

Abby Kumicky
(iso 100, f1.4 on aperture priority, eye level. Look at the dimension and colour contrast)

Abby Kumicky
(iso 100, f2 on aperture priority, eye level. Backlight, with proper camera handling the result will be like this, not forgetting you Photoshop skill also)

Mischa Luvriella
(iso 100, f1.4 on aperture priority, spot metering, eye level. Backlight, with proper camera handling the result will be like this, not forgetting you Photoshop skill also, this is not a good shot but I love the tone)

Mischa Luvriella
(iso 100, f1.4 on aperture priority, low angle. This is my personal favourite shot)

Mischa Luvriella
(iso 100, f1.4 on aperture priority, eye level. I really love the depth)

Mischa Luvriella
(iso 100, f1.4 on aperture priority, eye level. I really love the depth)

Conclusion, the reason I bought this lens is because I don't have to stand or sit far away from the subject especially wedding couple so my instruction will be clear because before this i used my Minolta 200mm f2.8G APO. The best part about the lens is the dimension produced by it and surprisingly the lens can capture sharp image at f1.4. CA is not a problem for cause I can always Photoshop it. What I'm trying to say here is to all portrait lovers out there 85mm is a must have lens doesn't matter if its a f1.2 or f1.4 or f1.8 or f2.8. Maximum the usage of the lens and you will get what you want :)

Have fun photo shoot :)